Google is one of the most popular search engines in the world, helping users find the answers to all sorts of inquiries. For businesses, Google is a powerful tool that can lead customers to your website. However, how do you know if customers are reaching your site via Google? Are these customers the audience you are desiring? Is the content Google highlights relevant information about your company and products? One way to find the answers to these questions is by using Google Search Console.
What is Google Search Console?

Discussed in module one of Carrie Saunders’ upcoming course, “The Converting Website,” Google Search Console (formerly known as Google Webmaster) is a search engine optimization (SEO) tool that focuses specifically on how Google finds, interprets, and shares your site to users. Google Search Console helps visualize the activities that take place on your website, as well as offer ways to compare certain metrics to see where you can improve your site’s searchability, presentation, and reach on Google.
Using Google Search Console
One of the main features Google Search Console offers is Performance Reports. A Performance Report is a visual graph that keeps track of four main metrics:
- Impressions – The number of times your site appeared in a Google search result.
- Clicks – The number of times users clicked on your site via a Google search result.
- Average Click Through Rate (CTR) – The percentage of impressions that resulted in a click.
- Average Position – The average position of your site in Google search results.
These graphed metrics help give you a snapshot of how your site is doing in terms of searchability and site traffic. For example, impressions can help you figure out if the keywords that Google is associating with your business are resulting in relevant search results. Clicks can help establish how well your site summary attracts possible customers, and Average CTR and Average Position help illustrate how well your site is competing with other possible businesses customers are presented.
Performance reports are also defined by dimensions, which are specific attributes of your data. Attributes such as country, page, device, and many others are presented in a table below the metrics graph, identifying the “who” and “where” of your site traffic.
With Google Search Console, you can further analyze just how the collected data can help evaluate your site by using the built-in filtering tool. This tool can be used to pick and choose which metrics you want to compare on the performance report graph, and can be pushed further to relate to specific dimension data collected. For example, you can compare the Average CTR of devices such as desktops and phones, helping you define just how well your site is presented on different platforms and if that impacts user interaction. Other filters, such as time, can also be applied as well, allowing you to visualize your desired data during specific dates. This single tool amongst the many Google Search Console has to offer can quickly help point out aspects of your sites that can be further optimized for Google’s search engine, helping you attract more customers!
Getting started with Google Search Console
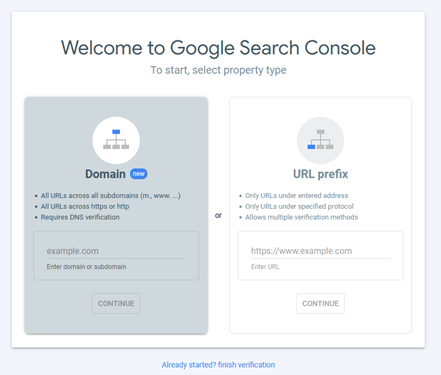
Google Search Console can vary in difficulty when it comes to getting started. One of the first steps required is to add a property to Google Search Console. This property can either be a Domain Prefix or a URL Prefix. Once you choose one, you will be required to verify that this property is indeed yours.
Here are the seven of ways you can verify a property:
- DNS Record
- HTML File Upload
- HTML Tag
- Google Analytics
- Google Tag Manager Container Snippet
- Google Sites
- Blogger
One of the most important methods on this list is DNS Records, for it is the only way to verify a Domain Prefix. Below, we will dive into how you would go about getting started with Google Search Console via a Domain Prefix.
1. First, you will need to create a property with Google Search Console here, where you will arrive on the screen below.

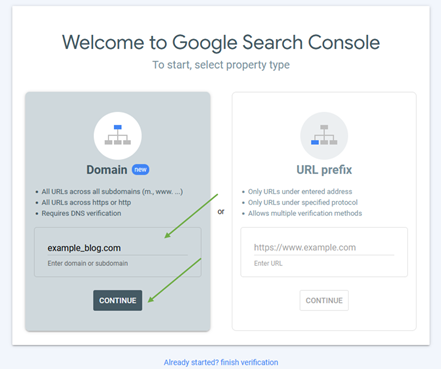
2. On the screen, you will be asked to add a Domain Prefix or a URL Prefix. Add your Domain Prefix under the highlighted “Domain” box and click “Continue.”

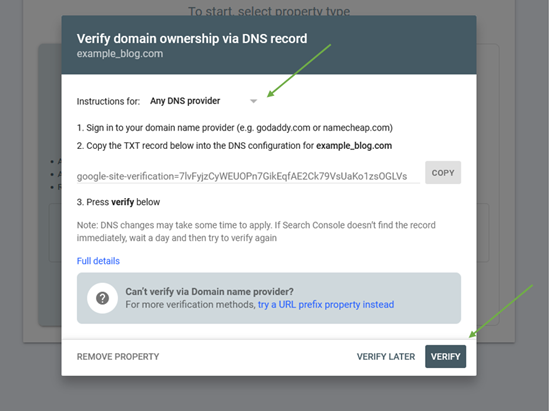
3. Next you will be asked to choose your method of verification. Here instructions will vary per domain provider. Click the drop-down menu next to “Any DNS Provider” and see if you DNS provider is listed. If so, click your provider for provider specific instructions, where you will most likely be required to log into your domain for verification. If your provider isn’t listed, follow the instructions under “Any DNS provider.” Once you have completed the instructions, click “Verify.”

Note that depending on your provider, the verification process may not be instant. If you are not verified immediately, check again in a few hours.
Can I get Further Guidance?
Carrie’s upcoming course “The Converting Website” will dive into further detail about Google Search Console as well as other useful tools and techniques for your business. Join the waitlist today to stay up to date about the course’s release!
