With Google’s Universal Analytics soon to be deprecated and
replaced by Google Analytics 4 (GA4), many website owners are beginning the adapt
their workflows to GA4. Since GA4 is structurally different than its predecessor,
its reports, measurements, and visualized metrics vary from Universal
Analytics, making a one-to-one transition impossible. However, due to popular
demand, one metric from Universal Analytics has returned: Bounce Rate.
What is Bounce Rate?
Bounce rate is a metric that businesses can use to visualize how their pages (and site as a whole) are doing. Bounce rate is the total number of single page sessions over the total number of entrances on the page. Simply put, bounce rate is the number of times users come to your page and leave without taking any important action. In this case, we want users to click on our links, buttons, or navigation bars to explore our content. Not clicking on anything results as a bounce. This metric is a popular way to identify what pages are not engaging enough for users and need improved.
Why did Google get rid of Bounce Rate?
While bounce rate is a useful tool, it doesn’t paint a
completely accurate picture of our websites. By assuming that a user who
does not click on anything after they arrive to our site as a bounce, we are
saying that those users were not engaged with our content. Bounce rate does
not take into account the amount of time a user spends on our landing page
before leaving. For sites that have long, content filled landing pages, a user
could have been exploring the landing page for 5 minutes before leaving.
Spending 5 minutes on our page clearly shows that the user was interested by
our content, but bounce rate does not consider that scenario.
To overcome this limitation, Google’s GA4 replaced bounce rate with a new metric: Engaged session. Engage session allows us to track when a user was engaged with more granularity but taking into account both time and actions. An engaged session is a session that results in an action (a click) OR lasts more than 10 seconds. By taking time into consideration, engaged sessions more accurately identify the amount of users who are attracted to our content.
However, changing to new metrics mean that businesses have to
change their analytics strategy. While changes to the way we use Google analytics
is inevitable, it was too sudden for some users, resulting in dissatisfaction. In
July of 2022, due to popular demand, Google added bounce rate to GA4 as an optional
metric.
How do I add Bounce Rate & Engaged Sessions to my reports?
Both bounce rate and engaged sessions are metrics that will
need to be manually selected in order to be viewed. Here is how you can get start
tracking these metrics in your GA4 account:
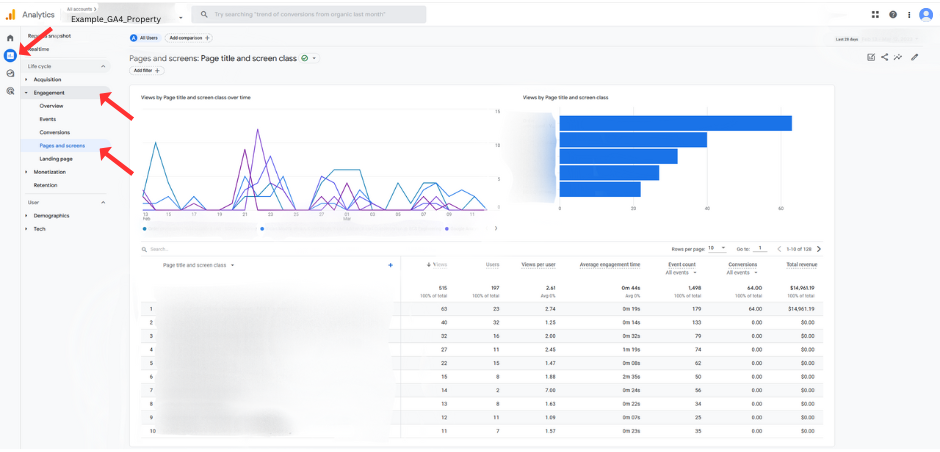
First, go to the Engagement tab of your Reports section,
followed by the Pages and Screens tab.
Pages and Screens Tab in GA4.
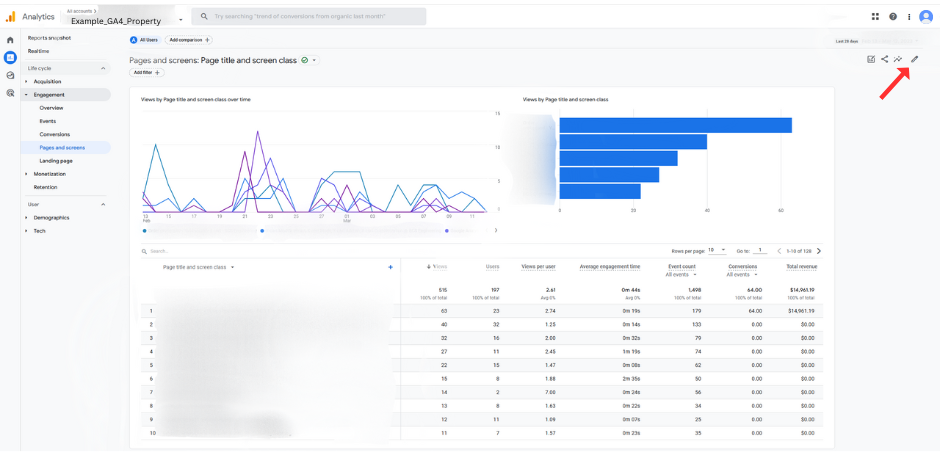
Next, click the pencil icon in the right-hand corner. If you do not see the pencil icon, you may not have permission to edit your GA4 reports.
The “pencil icon” in GA4.
Click on the Metrics tab.
Editing metrics in the Pages and Screens tab in GA4.
To add our desired metrics, click Add Metric.
Adding metrics to the Pages and Screens tab in GA4.
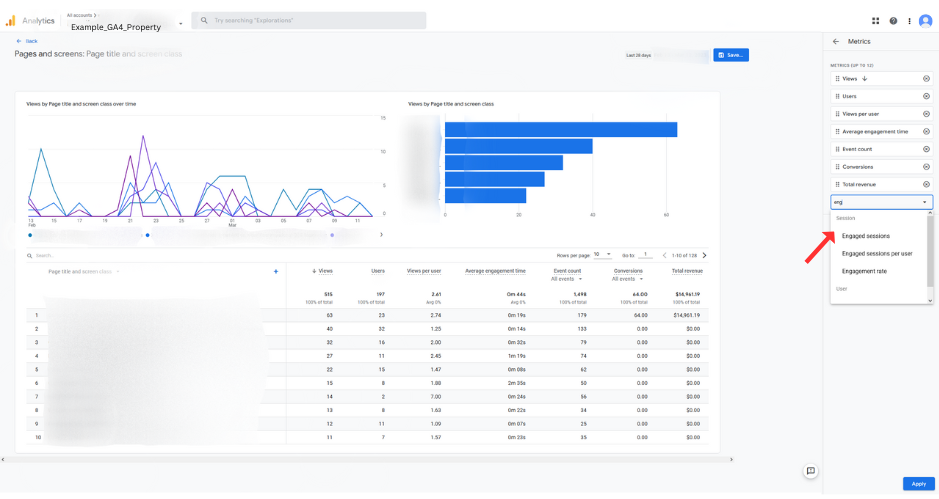
To add Engaged Session to our report, simply begin to
type out “engaged session” and you will see the metric appear. Click on it to
add it to the list.
Adding Engaged Session metric to the Pages & Screens tab in GA4.
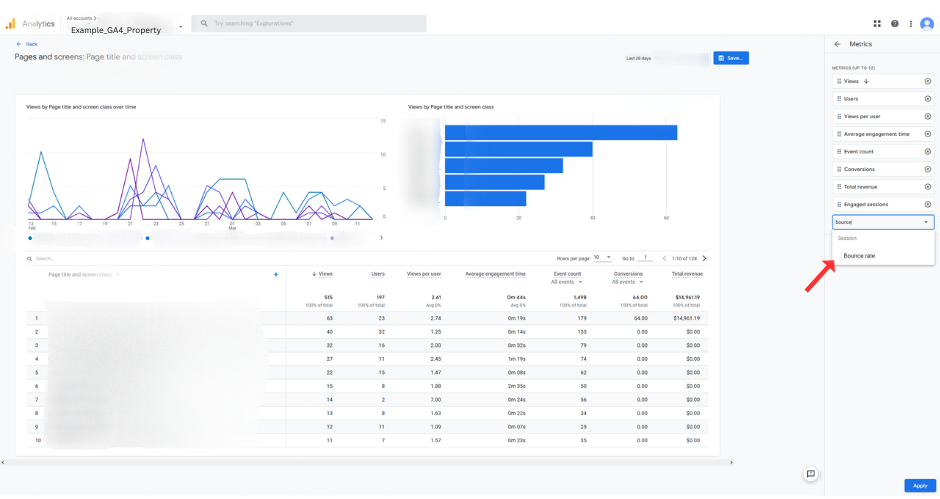
To add Bounce Rate to our report, we type out “bounce
rate” and you will see the metric pop up. Click on it to add it to the list.
Adding Bounce Rate metric to the Pages & Screens tab in GA4.
Once you have added your desired metrics, click Apply
in the bottom righthand corner.
Applying changes to the Pages and Screens tab in GA4.
Upon applying, you will see your new metrics included in
your report. If you are content with them, click Save and then Save changes
to current report. Confirm your decision.
Saving changes to the Pages and Screens tab in GA4.
Congrats! Once saved, you have successfully added bounce rate and engaged sessions to your reports!
Want to Learn More about GA4?
Whether we like it or not, Google Analytics 4 is here to stay. Check out our blog to learn more about GA4! Want to get started on setting up your GA4 property but don’t know where to start? Check out our free GA4 Crash Course to jump start your GA4 journey!
Starting July 1st, 2023, Google’s Universal
Analytics (UA) will stop collecting data. To continue collecting data, users
will have to transition to Google
Analytics 4 (GA4), Google’s improved analytics system. To make sure that
users will transition accordingly, Google will begin auto-migrating users to
Google Analytics 4 starting March 2023. However, what does that mean?
Who does Google’s Auto-migration effect?
Before we dive into what Google’s auto-migration includes, it
is important to note who this migration effects. There are two categories of
users that this migration can impact:
Users who have a Universal Analytics account
and haven’t begun transitioning – If you have been holding off on
transition your UA account, Google will automatically create a Google property based
on it.
Users who have created an incomplete GA4
property based on their existing Universal Analytics account – if you began
transition your UA account to GA4, but haven’t finished, Google will
automatically attempt to finish it.
At first glance, auto-migration may sound great! However, Google
themselves strongly encourage user’s to manually migrate their UA properties to
GA4 to ensure the quality of their data. The auto-migration is a means of pushing
users to begin using GA4 before UA is deprecated rather than a full migration. Google’s
auto-migration is not a one size fits all solution.
What is Google’s Auto-migration?
Google’s auto-migration will help you begin your transition
to GA4. The following events will occur during the transition process:
A GA4 property will be created.
UA property-level users will be copied over to
your GA4 property.
Site tags will be copied and be reused when
possible.
UA events will be reproduced in the GA4 model.
UA events & destination goals will be reproduced
as GA4 conversions.
Audiences will be migrated.
Google Ads links will be migrated.
UA conversions used in Google Ads will be
swapped with GA4 equivalents.
UA audiences used in Google Ads will be paired
with GA4 equivalents.
Note: Google Analytics 360 properties will not be auto-migrated
360-enabled UA properties are not included in Google’s auto-migration process. For these properties, you will have to manually migrate them to your GA4 property.
What are the downsides of letting Google migrate my property?
Less Control Over your Migration Plan
By letting Google auto-migrate your properties to GA4, your
migration plan may become more complex. Google’s auto-migration is intended
to help you start your transition to GA4, not complete it, which means some loose
ends may remain. Finding those loose ends could be a hassle, or worse, cost
the company money if vital reports aren’t working like they are supposed to. For
reports and properties that are critical to your business, manual migration is
highly suggested.
GA4 is not UA
While Google’s auto-migration will make it easy to move over
simple UA properties to GA4, it’s important to keep in mind that
GA4 will not work exactly as UA did. GA4 has shifted its model to focus on
customer retention rather than customer acquisition alone. This means that existing
UA properties may not fully utilize the capabilities and value that GA4 has to
offer. Instead, it is important to make sure you approach GA4 as a new
system that requires new data collection and monitoring strategies.
Steep Learning Curve
Since GA4 is a new system, some UA
metrics do not exist in GA4. During the auto-migration, Google will swap
UA properties that do not exist in GA4 with the GA4 equivalent. This means
that, when you take a look at your GA4 property, you may not recognize valuable
metrics that your company relies on. By not manually transition your site,
you will be left having to figure out all of GA4’s changes on your own.
Learning about GA4 before the UA is deprecated is important to continuing to
obtain valuable data from these analytics tools.
Can Google’s auto-migration be beneficial?
If you consider your UA account to have basic configurations,
you may wonder if auto-migration would be fine. However, the more important
question to ponder when deciding what to do about Google auto-migration is
whether or not the analytics data is imperative to your business flow. If you
have not fully incorporated Google analytics into your business strategy, or
were just getting started, the auto-migration process probably won’t do much
harm. If you rely heavily on Google
analytics, however, manually migrating important aspects of your UA account is
highly encouraged.
Can I Opt-out?
At this point in time, the opt-out period has ended. However, there are still some ways that you can avoid Google’s auto-migration process:
Method 1: Delete your Auto-generated GA4 Property
For users who only have a Universal Analytics property and don’t want your auto-migrated GA4 property, you can delete the property.
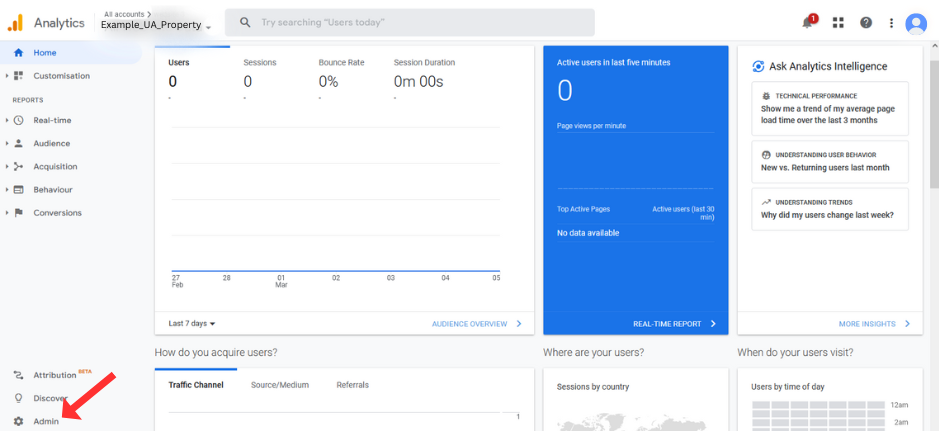
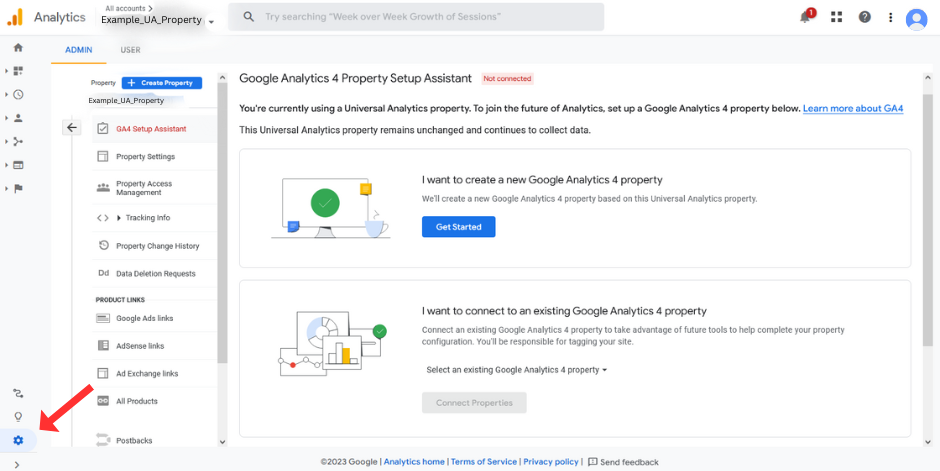
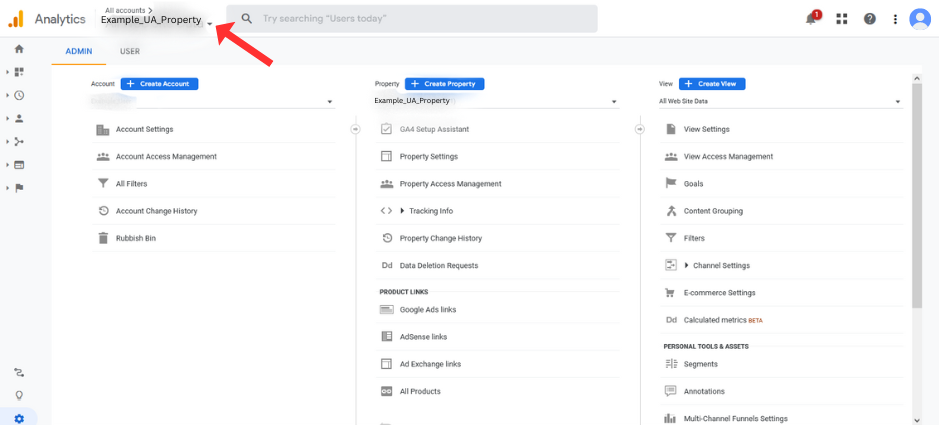
Go to Admin.
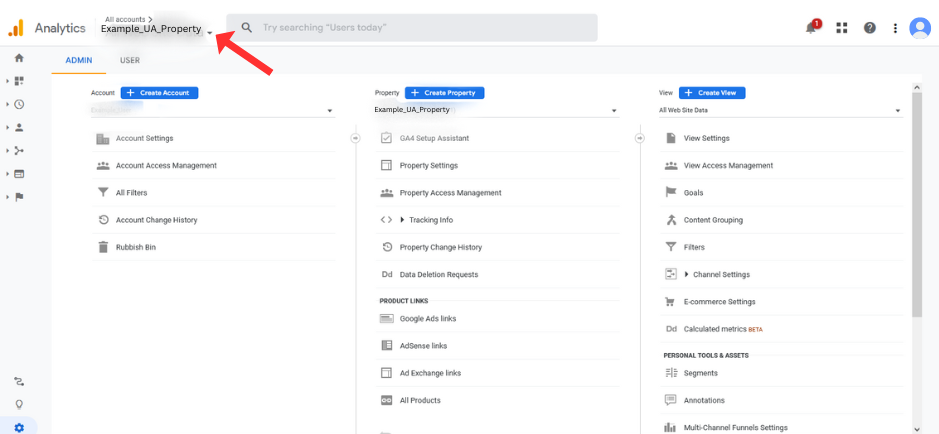
Make sure you are on your desired Universal Analytics property.
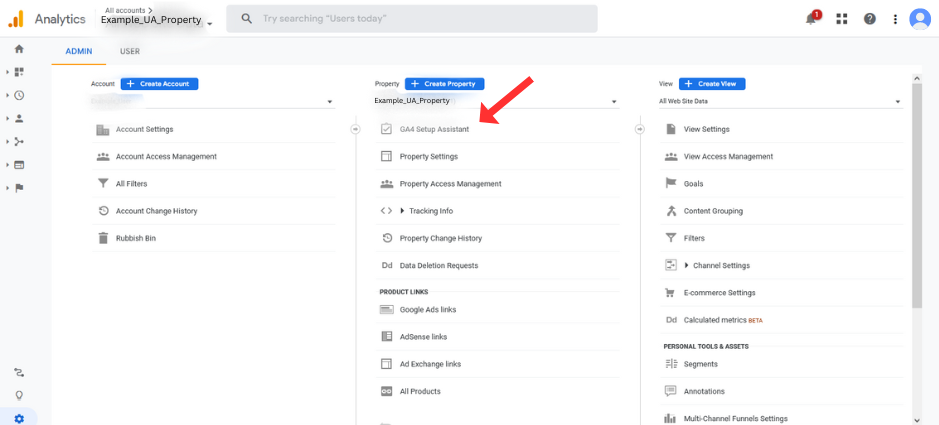
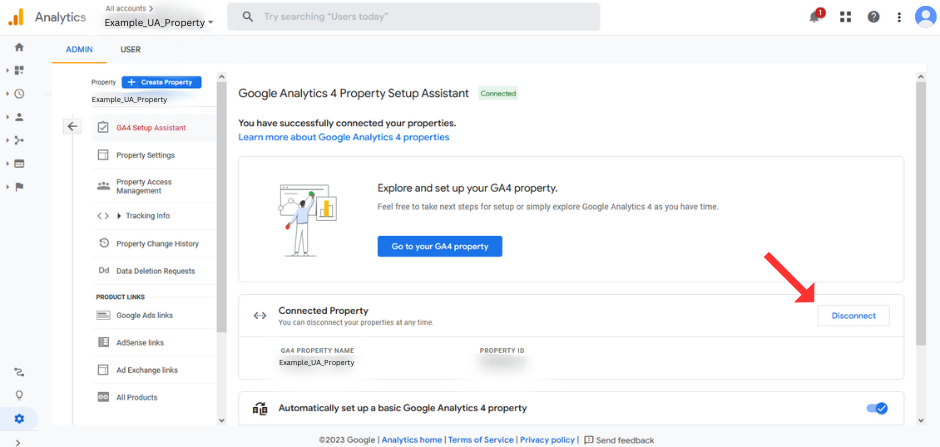
Click on GA4 Setup Assistant in the Property Column.
Next to Connect property, click Disconnect.
Confirm your Decision.
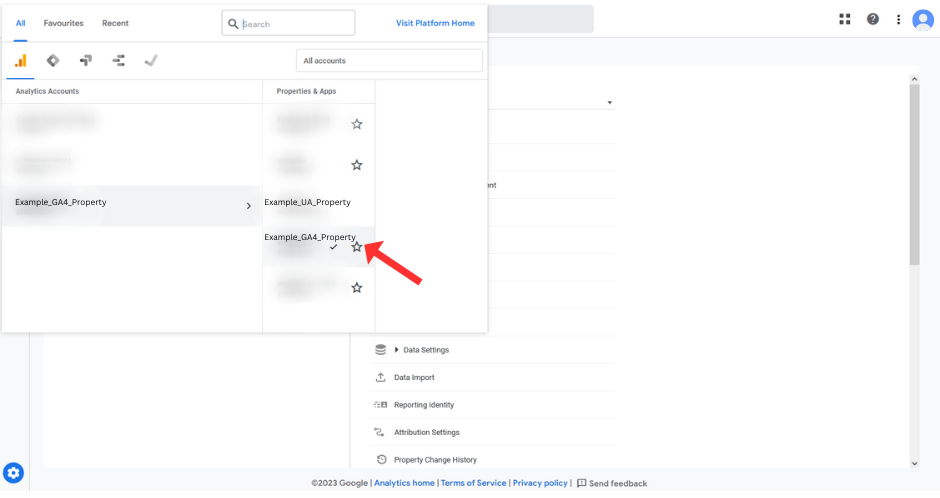
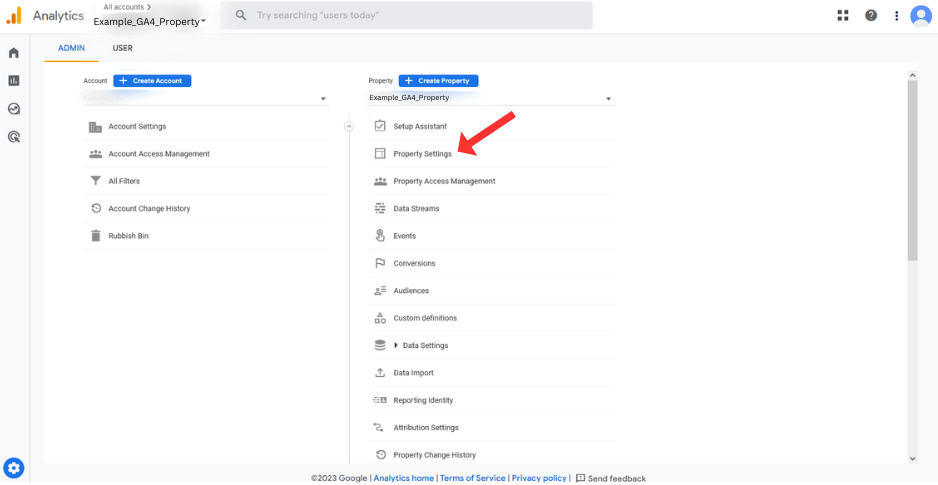
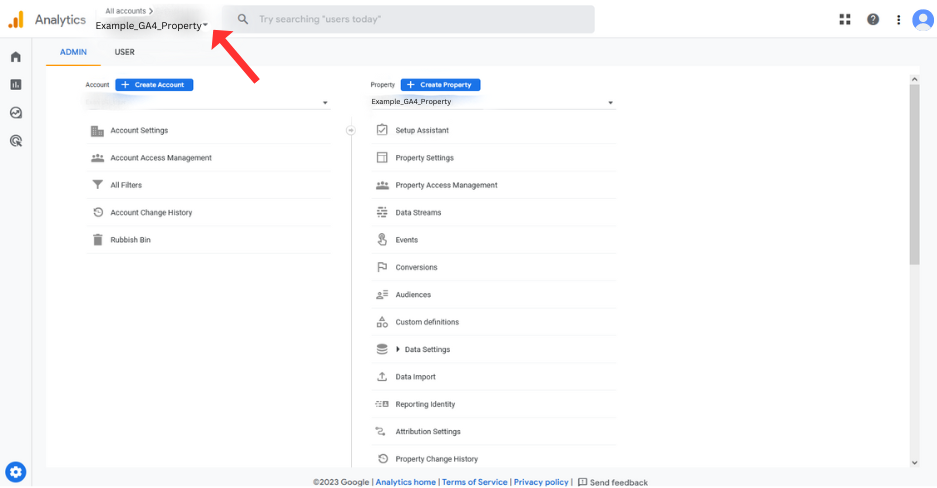
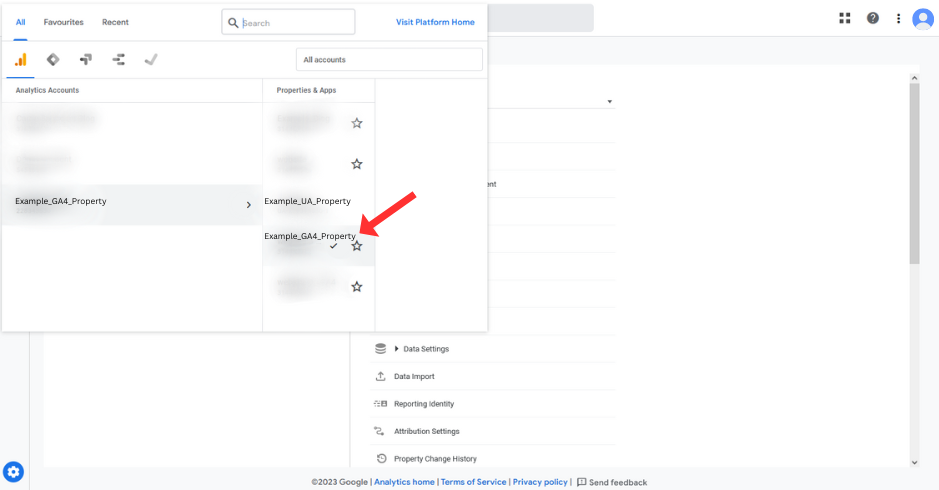
Now, you can safely go to your auto-generated GA4 property and delete it. First, go to Admin.
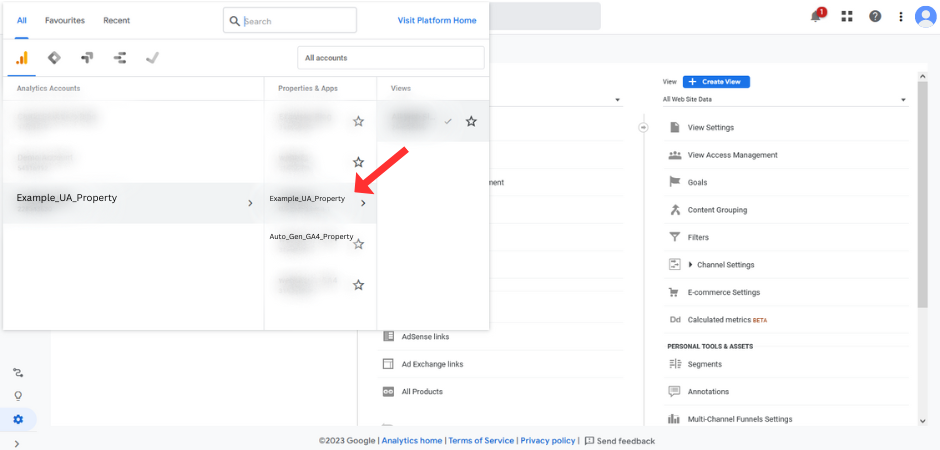
Click on your list of properties to make sure you are on the auto-generated GA4 property.
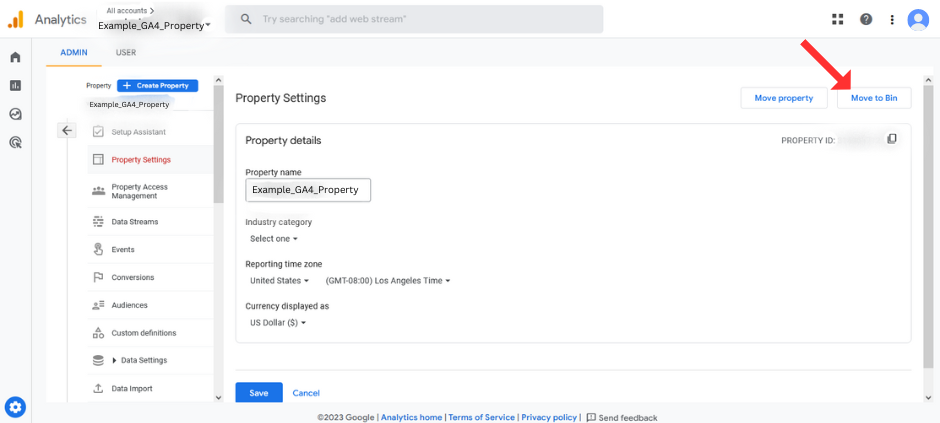
In the Property Column, click Property Settings.
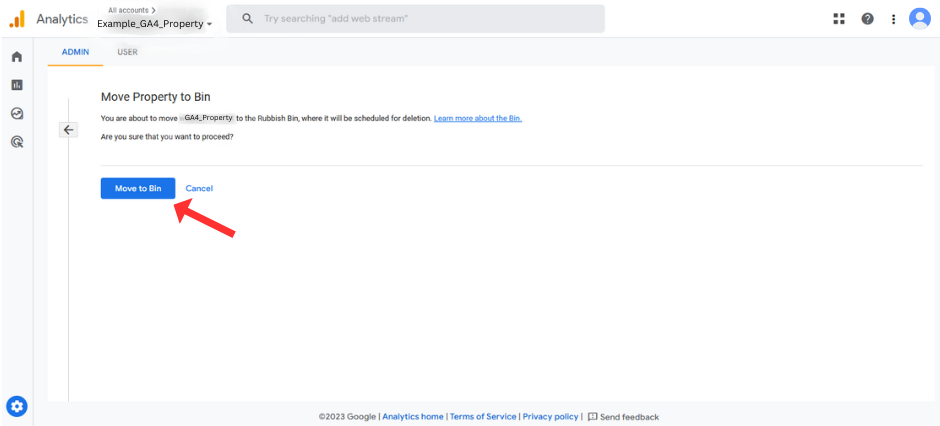
Click Move to Bin.
Confirm your decision.
Method 2: Save the rest of your GA4 Migration for Later
For users who have an incomplete Google Analytics 4 property and don’t want Google auto-complete the rest based on their connected UA account, we can tell Google to leave certain configurations alone.
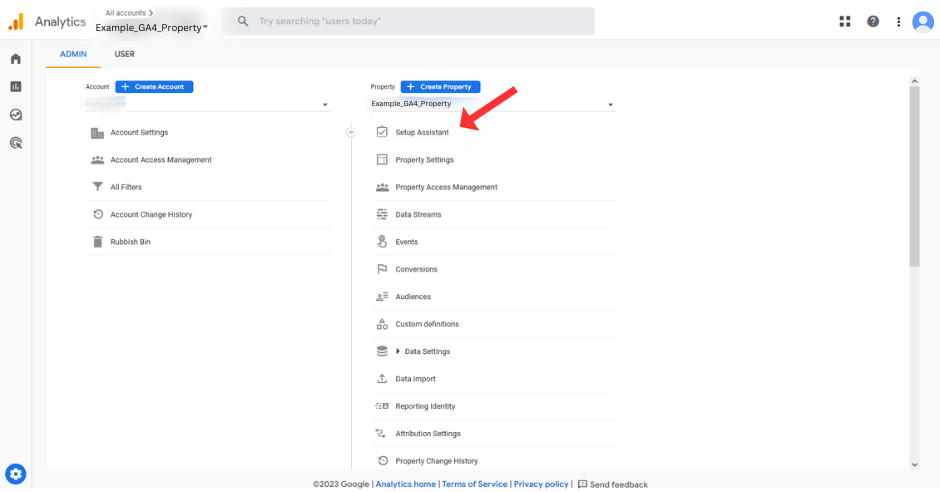
Go to Admin.
Make sure you are on your desired GA4 property.
Click Setup Assistant in the Property Column.
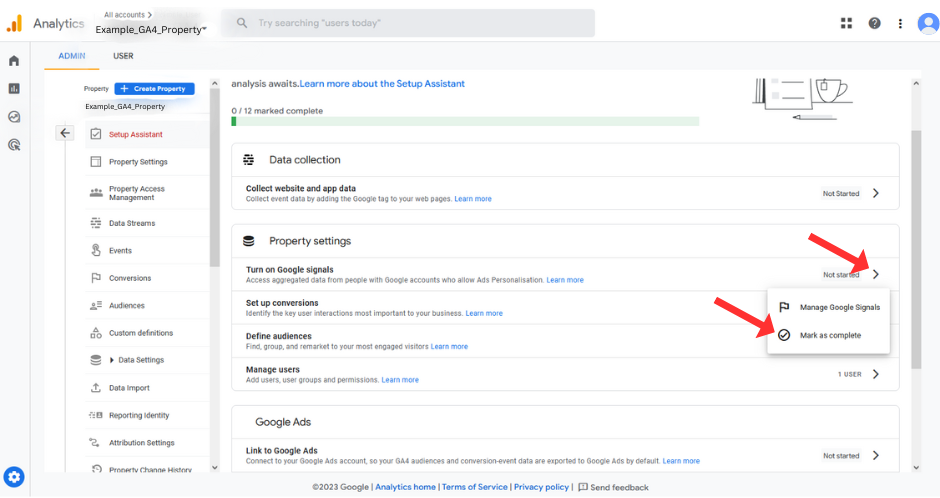
Click on the far right arrow of a task you don’t want Google to complete of you. Click Mark as complete.
Repeat this step for any tasks you want to complete on your own time.
Want to start learning about Google Analytics 4?
Whether we like it or not, Google Analytics 4 is here to stay. Check out our blog to learn more about GA4! Want to get started on setting up your GA4 property but don’t know where to start? Check out our free GA4 Crash Course to jump start your GA4 journey!
Email marketing is an easy and cost-effective way to engage with customers. By keeping in contact with customers and sharing valuable content with them, emails help us build long lasting relationships with our users. In this article, I want to go over 4 steps on how to get started with email marketing.
Step 1: Grow your Email List
To begin an email marketing campaign, you first need to have
an audience to send content to. We can grow our audience in multiple ways:
Have a Subscribe Link on your Site
Placing a link in on your websites to join your email list is
an easy way to gain an audience. Your link should be somewhere where users
will notice it, such as the header or the footer of your site. You could even a section devoted to your email link on
your homepage. Beyond your site, it doesn’t hurt to put your email link in
other common places your users may visit, such as social media or your linktree.
Create and Advertise Lead Magnets
Lead magnets are valuable pieces of content that attract
users to join your email list. A lead magnet could be a short guide on a
topic you have expertise in, a useful template, a tool, or so forth. To receive
a lead magnet, users exchange their email address, so creating it’s important
to make your lead magnet attractive. The key to a good lead magnet is
knowing what your customer needs. Successful lead magnets provide help to your
target audience’s pain points, making your email list enticing to sign up for.
Just like your subscriber link, your lead magnet should
be shared in places where traffic is common, such as social
media, blog
posts, your linktree, and so forth.
Note: Your opt-in message is key
Getting users to see and click your subscriber link or lead magnet is one thing, but getting them to opt-in is another challenge. For both, you will either want to have a dedicated landing page where users share their information, or a popup or embedded form in your site. Alongside your form should be an explanation as to what users gain when they join your email list. This explanation is important to showing your users that your email content or lead magnet is worthwhile.
Step 2: Create Valuable Content
Once your have a list of emails, you can start creating content to send to your subscribers. Just like with the content on your site or social media channels, your content should speak to your users. What do your readers want to know? What do they need help with? Sharing content such as advice, updates on your business, promotions, and so forth can help make your emails interesting to read. Afterall, we get so many emails daily, so making sure your content is worth opening is important.
Note: As your lists grow, you can personalize content
With a large list of subscribers, you may have a variety of types of readers with different interests. With the help of email software, you can send content to subscribers depending on factors such as previous purchases, form responses, and other user input. Personalized content helps us accurately share content that speaks to each individual reader.
Step 3: Be Consistent
As with your blog and social media content, successful
email marketing requires consistency in the frequency of your content. Create
an email schedule and stick to it in order to keep your readers engaged. When
determining your email schedule, determine what days and times your target
audience tends to be checking their email. A general rule of thumb is to send emails
around 11AM on Tuesdays.
Note: Email Software can help automate the process
Email software can help make the scheduling process easier. Through email software, you can create, schedule, and send emails to your subscribers. Email software can also help in identifying trends, conducting split testing, and providing access to templates.
Step 4: Measure & Improve
With the help of email software, you can collect statistics
on how well your emails are doing. Metrics such as open rate, bounce rate, and clicks
can help you understand what kind of content your readers want to see. Your
readers interests may change overtime, so keep track of these metrics if available
to keep up with what they want to see.
Where can I start in using Email Marketing for my Business?
Want to get started in email marketing? At BCS Engineering, we use AWeber to
keep our customers informed. With the help of email software, you can create
and schedule emails, divide customers into email lists, and track how well your
emails are doing! Check
out AWeber and other email marketing software out there to start your email
marketing journey!
Through Search Engine
Optimization (SEO), we aim to increase our site’s position in search
results and gain more traffic. The higher our rank, the more likely our site is
providing a valuable experience and meeting the requirements of our target
audience. In a sense, SEO helps us refine our expertise and authority in the
eyes of both our users and Google. One SEO strategy we can use that can
increase our credibility further is the use of backlinks.
What are Backlinks?
Backlinks are hyperlinks that lead to another site.
Unlike internal
links that lead to another page on the same website, backlinks take users
to resource that is off-site. For example, a backlink could be used in a blog
post to reference helpful resources that, while not apart of the blog’s home
site, have been deemed useful to provide to readers.
Why are Backlinks Important?
Since backlinks are inbound or external links from different
sites, having a backlink leading to your site suggests a level of credibility and
trust. Most of us wouldn’t want to link our websites to just any site, we would
want to make sure that we are connecting users to quality resources. To have
a backlink is to be considered authoritative by the site linking to you, and
Google notices that. Sites with many backlinks to them can thus be ranked
higher than other related search entries.
On top of increasing
your SEO Rank, backlinks are a form of “word of mouth” advertising. Having a
backlink to your site is like having a referral. People are more likely to
check out your content if others vouch for it.
Backlinks also make your site more visible since your content is linked
to places. Inbound links to your site give you access to a wider range of
customers who are already primed for your content.
Note: We can see Referral Traffic with GA4
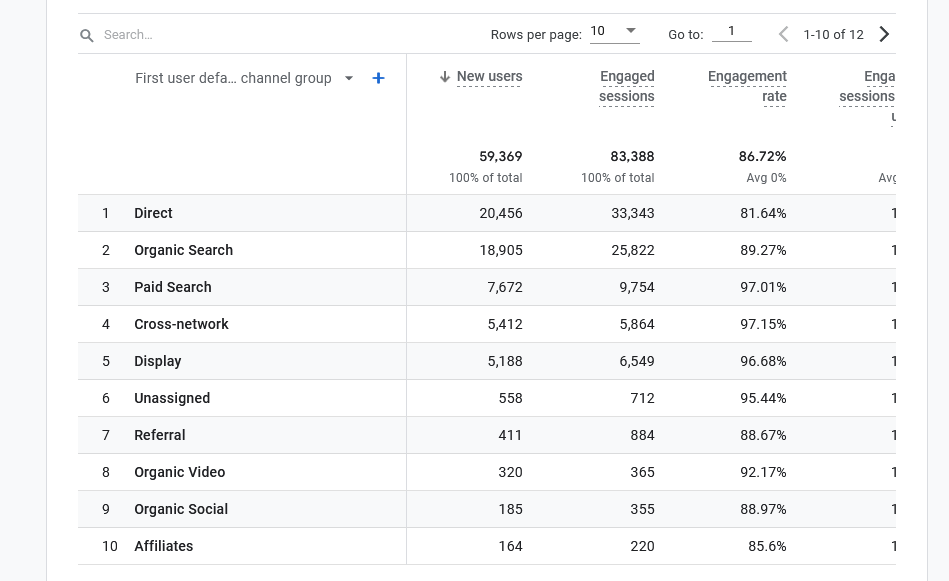
If you are curious to identify if there are backlinks bring traffic to your site, you can use GA4 through the “Referral Traffic” stat. By going to Reports, Acquisition, and then User Acquisition, we can see in the list of channel groups how many users we are getting from backlinks.
The User Acquisition Tab in GA4. In row 7, we can see stats for Referral Traffic.
Are their Different Types of Backlinks?
While backlinks are great credibility boosters, not all
backlinks are created equal. There are a variety of types of backlinks that can
come with varying degrees of trust and authority:
Follow Links – backlinks that fully consider the link authoritative. In this case, having no additional attributes added to the link makes the link trustworthy to the linker.
Example of a Follow Link.
NoFollow Links – Backlinks that do not consider the link authoritative. If you had to link to a site but didn’t want Google to associate your content with it, you would use a NoFollow Link.
Example of a NoFollow Link.
Sponsored Links – Backlinks that are sponsorships, advertisements, or paid placements. These links involved the exchange of money to obtain.
Example of a Sponsored Link.
User Generated Content (UGC) Links – Backlinks to content created by users. These links help Google understand that posts in, for example, forums or blog comments, are not endorsed by your site.
Example of a User Generated Content (UGC) Link.
Note: There are Google Penalties for suspicious backlinks
Since backlinks can be used in manipulative ways to trick Google into boosting a website’s SEO rank, Google penalties for backlinks exist. Any link that is paid for, for example, should be marked as a paid link to avoid accidentally penalties. Automated linkage or even exchanging links with another site for the sole purpose of increasing your SEO score quickly can also be seen as manipulative. When considering Googles rules, its best to check your SEO strategy against Google’s search essentials.
How do I use External Backlinks?
When it comes to linking your content to a different site,
there are a few important factors to keep in mind when choosing what sites you
want to backlink to. Overall, we only want to backlink to an external site
if the content in that link is valuable to us and our users. Before
creating an external link, ponder the following questions:
Do you trust this source? – when creating
an external link, you want to determine the authority of the source. There are
tools that exist that can inform you how many other sites have backlinked to
this source, but you also want to consider how valuable and trustworthy the
source is to you specifically.
Is this source related to your site? –
External links in our sites exist to aid our readers, and thus aid our cause.
Making sure the external links on your site are relevant to the topics your
site is centered around is important to Google’s understanding of your content.
How do you plan to incorporate it into your
content? – Where and how you link an external source into your content can
determine how useful it is to you. As discussed earlier, there are different
ways we can backlink to a site, but we also want to keep in mind the words or phrases
we choose to use in our hyperlink. Links, external or internal, should be attached
the targeted keywords
you want associated with your business.
How do I get Internal Backlinks?
While backlinking to useful resources off our site aids our users, ideally we want our content to be backlinked on other sites as well. The key to getting other sites to consider linking your content to their page is creating valuable content. When creating content, we want to make sure that we are filling a “gap” for readers. This gap is something that other sites are missing despite being similar to your own. By creating content around gaps, we can provide readers with one of a kind information. Such value can encourage backlinks to your site.
Want to Learn More about SEO?
SEO is a continuous process with a variety of strategies to explore. Explore our SEO blogs to learn
more tips and tricks to improve your visibility! If you want more
hands-on guidance for improving your website, join the waitlist for Carrie
Saunders’ upcoming course, “The Converting Website.” In this course,
she will dive into a variety of important factors that aim to optimize your
website.
In previous articles, we have discussed many avenues of
increasing traffic on our sites. From on-site
content for our customer to explore to offline marketing efforts through social
media, keeping users engaged through content is key to creating reoccurring
customers. However, revisiting the
idea of customer
confidence, some of the most engaging and effective content we can have
is user generated content.
What is User Generated Content?
User generated content is content created by our
customers that discuss our company and products. These powerful pieces of
content are word-of-mouth advertising for eCommerce businesses and can be
extremely effective in encouraging hesitant customers to give your products a
shot. We can find user generated content in formats such as:
Posts & Comments – written topics and
responses brought up by users that related to your company.
Testimonials & Reviews – structured
ratings or written experiences of customer reactions to your products and
services.
Q&A & Forms – moderated discussions
concerning questions, concerns, or ideas that customers have that relate to
your company.
Images & Videos – shared visuals of
your customers using your products and services.
Benefits of User Generated Content
The main benefits of having user generated content on your
site is the increase in traffic it brings as well as its treasure trove
of information.
Word of mouth advertising is more effective than us claiming
our products and services are valuable. User generated content provides
social proof that what we offer is truly worth considering, and that trust
between customers can encourage other users to buy from us. Sharing user
testimonials and reviews are a good first step in using user generated content
to grow the trustworthiness and authority of your company.
Note: Do not use user generated
content without consent
When using user generated content for marketing purposes, always ask the permission of the user. Whether it be a review or an image, make sure to get official consent from the creator. Gaining official consent to use user generated content not only prevents legal issues, but also builds a relationship or respect and trust between you and your users.
User generated content offers us insight into what our users
want and how they communicate. Keywords, unfulfilled industry opportunities,
and feedback can be found in user generated content. This information can
help us improve our SEO strategy as well as jump on future business opportunities.
Keeping track of common questions in Q&As as well as the pros and cons
shared in reviews can help guide us on where our customers want us to go next.
How to get user generated content
Have Avenues for Users to Share their Content
Whether it be an onsite forum or a social media page, the
first step to gain user generated content is to have places where users can share
content. In our previous article on social media, we explored some of the
differences between social media channels. The same idea applies to your
website: different page types, such as Q&As, forums, and review forms
can invite different user generated content from different kinds of people.
Having a variety of places on and off your site where users can talk about your
company makes it easier for users to share their content with you.
Note: Some channels require moderation
Much like social media, not all channels of communications are the same. The same applies for different on-site pages that users can interact with. Forums, for example, should have rules that users must follow and are enforced. Without rules, forums can become full of spam and irrelevant content. When choosing what kind of channels you want to offer, research the work you may have to do to maintain it effectively.
Tell users what content you want to see
In order to encourage user generated content, telling users what kind of content you are looking for can help. It’s important to remember that many users may have stories to share, but won’t unless asked. You could ask for users to share their favorite photo concerning your product or service, or to write down how your company has helped them. On social media especially, having user generated content competitions or encouraged themes can lead to more content as well as guide the topic of that content to something valuable.
Want to learn more about bringing traffic to your site?
Optimizing your site for conversions is a full site effort. Check out our blog to find more
tips and tricks on how to improve your optimization strategy! If you want more hands-on guidance for
improving your website,join the waitlist for Carrie Saunders’ upcoming course, “The
Converting Website.” In this course, she will dive into a
variety of important factors aim to help you turn more visitors into customers.
In previous articles, we have explored many ways that we can implement SEO strategies into our website optimization process. However, once we hit high ranks in searches for the words we are targeting, how do we maintain our success? While it is exciting to see our sites on the front page of searches, we can’t stop thinking about SEO. New businesses and products can enter the industry. Words can change in meaning and usage. Customers naturally expand to new platforms. Constant change in the eCommerce industry requires us to continue updating and implementing SEO strategies.
Establishing expertise with our users, carefully choosing our words, and making sure our site provides quality user experience are essential SEO tactics. However, there are other SEO strategies we can use to retain and improve our SEO score. One strategy we can considered is optimizing our content for Google’s “Featured Snippets.”
Google’s Featured Snippets
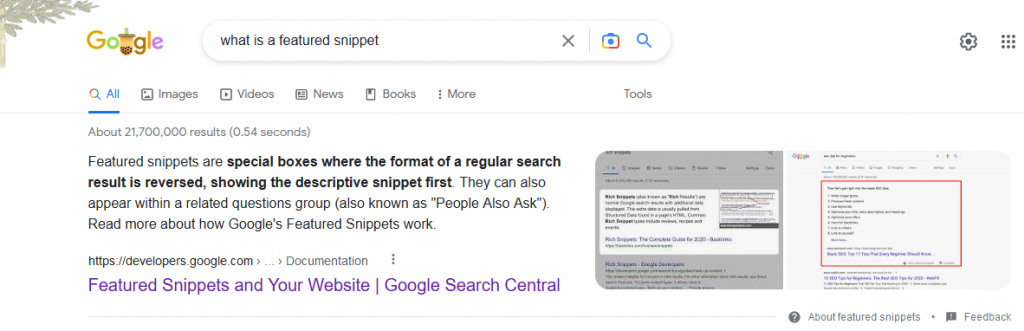
Featured Snippets are a unique and profitable opportunity to bring more traffic to your site. These “snippets” are brief, informative glimpses into content that is usually associated with answers to questions. For example, if we ask Google “What is a featured snippet?” we get the following snippet:
A benefit of featured snippets is that they can bring our content to the top of a search page without having a high rank. Featured snippets are placed above the first organically ranked suggestion, making it the first thing users see when browsing the search results. Having our content in “Position 0” of a search result can increase our visibility, bringing more users to our site.
Note: Clicks in Featured Snippets
One of the main concerns about Google’s Featured Snippets is the possibility of users not clicking our content. Featured snippets can come off as counterproductive since users may read the answer to their question and leave. However, featured snippets aid us in taking clicks away from our competitors. By providing succinct answers, users will leave the search results without clicking on a competing company’s site.
Types of Featured Snippet Content
Since featured snippets tend to be answers to questions, our content needs to not only be valuable, but understandable to search engines. As seen in the example, a snippet only pulls part of your content in an attempt to answer a question. To understand what kind of content Google’s presents in a featured snippet, we need to understand the common formats available.
Text Definitions
As illustrated in our first example, text snippets answer questions by providing brief and clear text results. These answers tend to be sentences pulled from your content and presented in the snippet.
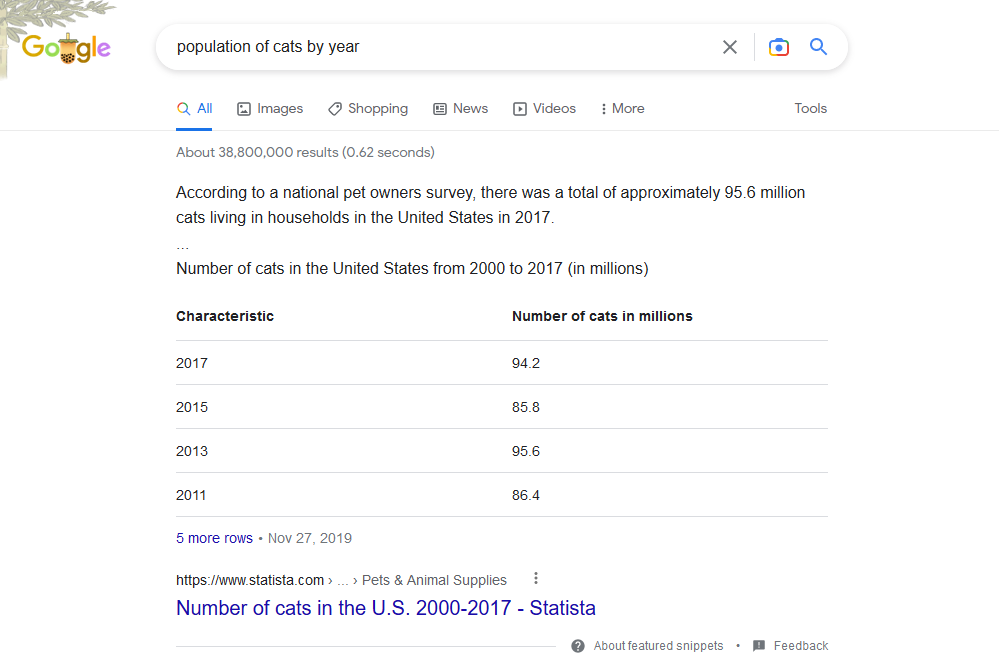
Tables
Tables are similar to text snippets, but are featured snippets that present a collection of data . These snippets tend to be numerical and only give a glimpse of the table presented in your content.
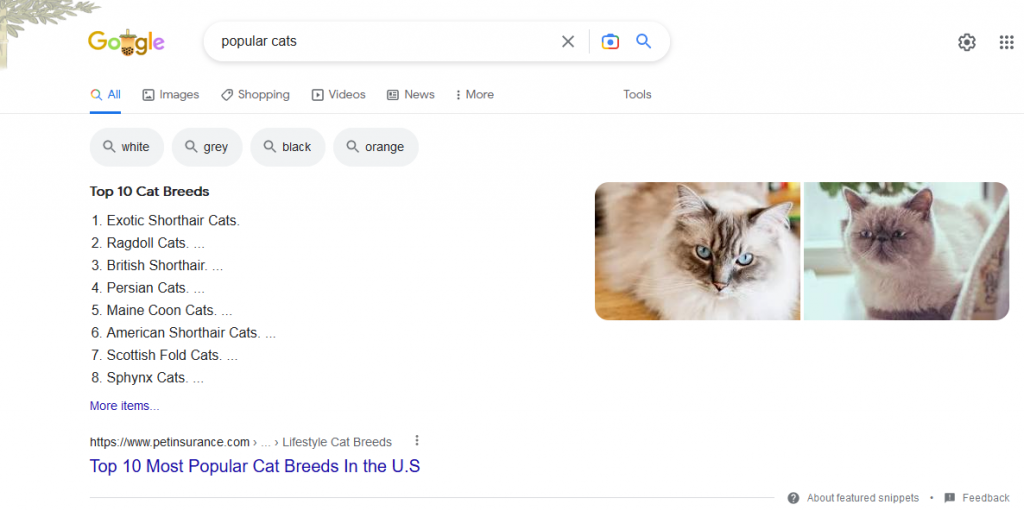
Lists
Whether they be numerical, bulleted, or unordered, list snippets are a collection of related content. Much like the other snippets, these snippets only show part of your list in the featured snippet.
Note: Not all featured content is a snippet
When we search on Google, we can get different kinds of content previewed at the top of the search results. However, not all “featured” content are featured snippets. Google’s “Rich Results” look a lot like featured snippets, but are merely enhanced listings.
Getting a Featured Snippet
Getting your content into a featured snippet requires research and attention to format. Before you create content for featured snippets, you need a good understanding of what your target audience is looking for. Knowing what kind of questions our users ask can aid us in knowing what types of answers to provide. One way we can discover featured snippet opportunities is to step into our user’s shoes and search terms and questions related to our expertise. Analyze what current featured snippets exist and determine if you can create a more succinct answer.
As you craft your answer, you need to keep the format of your content in mind. Depending on what kind of featured snippet you are creating, there are some general tips to keep in mind:
Text Feature Snippets
For text formatted content, you will want to make sure that your content is between 40 – 50 words long. Frame your content with the question you are answering to make your content clear to Google. Most importantly, make sure that the answer you are providing is objective. Google is looking for quality definitions rather than opinions when it comes to their featured snippets.
Table Featured Snippets
With table content, the key to successfully gaining a table featured snippet is to format your data as a table. Google does not create tables based on the content on your site. Instead, Google takes your existing tables and features them in the snippet. Since tables have specific uses, the best way to optimize for a table featured snippet is to present data in tables often.
List Features Snippets
When it comes to list featured snippets, format matters. When design a list for a snippet, make sure to use headings in your content. By using H2 and H3 Headings for your list, Google can better understand that you are creating a list. In the case of step oriented lists, we can go a step further and incorporate numbers to identify that this is an ordered list. Overall, keep your format consistent so that the content in your list is understood correctly.
Want to Learn More about SEO?
SEO is a continuous process with a variety of strategies to explore. Explore our SEO blogs to learn more tips and tricks to improve your visibility! If you want more hands-on guidance for improving your website,join the waitlist for Carrie Saunders’ upcoming course, “The Converting Website.” In this course, she will dive into a variety of important factors that aim to optimize your website.
When a potential customer wants to reach out to us about our
products and services, we want to make it as easy as possible for them to
connect with us. Our contact information can usually be found on our contact
page. A contact page is a must have for any business, but creating a quality contact
page can take more thought. Let’s go over some best practices and suggestions
that can help make your contact page clearer and easy to use.
Make Sure the Page is Easy to Find
The first step to creating a good contact page is properly
placing it on your site. Most contact us pages are linked within the main
navigation bar of your page, and in the footer as well. These locations are
must-haves since most customers will assume that your site is structured similarly
to other sites they have visited.
Keep the Title Recognizable
While we may want to use unique page names within our site to stand out as well as adapt our language to that of our customers, contact pages are best left alone. Changing the page title from “Contact Us” to something else, such as “Give Us a Call” or “Connect with Us,” can make your page harder to find. This is because customers may be looking for the words “Contact Us” since many contact pages follow the same naming convention.
Share Multiple Ways to Connect with Your Business
Once a user is on your contact page, we want to share how they can get a hold of our business. For the convenience of the user, offering multiple methods of contacting your business can make a user more likely to reach out. Having the option of calling, messaging through email or Live Chat, or utilizing a contact form allows users to choose their preferred method of contact.
Note: Hours and Departments
When sharing your available contact methods, it is important to note any time sensitive or important details related to those options. For example, if your phone is only manned during certain hours, that should be noted in that contact option. Expected response time for emails or Live Chat can also be important for users when deciding what method they want to use. We can also lead users to the correct people or departments if we properly document our communication options in our contact page.
Create Simple Contact Forms
Contact forms are a great way to connect with users. However, we should make sure we don’t over complicate the contact form process. While we can theoretically ask for as much information as we want, keep the information required to complete a contact form minimal. The must-haves for a contact form only amount to three fields: the user’s name, their email, and a brief description of what they are messaging about.
Optimize for Mobile
Since many users are visiting our sites from their phones, it’s important to test your site for mobile use, including your contact page. Making sure that your contact page is still readable and that your contact forms adjust properly for mobile are a few aspects to keep in mind. Since our contact page holds important information that could determine whether a user becomes a customer, keeping your contact page simple and straightforward can help the optimization process.
Want to Learn More?
Our contact page is just one of many parts of our site that can be key to
turning visitors into customers. Explore our other blogs to learn more about what
you can do to improve your site! If you are interested in a more hands-on
course about how to optimize your website, join the waitlist for Carrie Saunders’ upcoming
course, “The Converting Website.” In this course, she will dive into
important factors that aim to increase the conversion rates of your site!
As we optimize our sites and channels, it can be difficult to know what’s working and what’s not. We may understand our goals well: bring traffic to our site, attract more engagement, and turn visitors into customers, but measuring our progress towards those goals can be vague without firm numbers. To gain a better understanding of the success of our efforts and campaigns, we can establish marketing metrics to measure our goals with hard data.
What are Marketing Metrics?
Market metrics are numbers that we can use to measure the progress we are making towards our goals. The metrics themselves can vary depending on our goals, but they are usually defined by interactions with our content and changes in the performance of our site.
Why are they important?
Having numbers to define the progress of our optimization
efforts can help us understand where we should be putting our time and money.
With metrics to track, we can start to identify if our changes and campaigns
are truly making a difference. By measuring customer interactions, for example,
we can start to understand what our customers want to see versus content that
is uninteresting to them. We can start making more of the content that receives
more attention: more likes, reads, shares, etc., while pulling back on the
content that isn’t attracting our customers. Overall, with marketing
metrics, we can optimize the way we decide our next steps.
What are Common Marketing Metrics?
The metrics we decide to track not only depend heavily on the goals we have for our company, but also depend on the channels we are utilizing to improve our site.
Content
Content marketing is an easy and broad method we can use to attract more users to our site. Writing blogs, creating infographics, and sharing customer reviews are ways we can use content to encourage potential customers to interact with us.
Metrics that can inform us of the success of our content
marketing efforts include things like page views, engagement time, and link
clicks. For example, a successful blog topic will receive more page views
than a topic that is uninteresting to your audience. Beyond the topic itself,
the content within the blog can be measured by how long people read it. Were they
there for a few minutes or a few seconds? Finally, if your audience enjoys your
blog, they may click links within the article to explore your site further.
How to Track: Analytics Tools
In order to collect data on how users interact with our webpages, we need tools that have access to our site and that can collect data on our users. Some hosting platforms come with varying degrees of analytics tools, but to get a full picture of our site, we can use Google Analytics.
Social Media
Social
media is a great way to reach your audience beyond your site as well as
interact with people who have yet to encounter your products and services. There
are a variety of social media platforms we could use, but almost all of them
aim to engage directly with our audience.
The metrics we track on our social media channels vary
per platform, but are all based on user interaction. Likes, shares, and comments
are the most common types of interactions we can encounter. Likes can help
guide us on what kind of content our users want to see on our social media
accounts while shares can really point us to the content that is truly
resonating with our followers. Comments, on the other hand, can suggest both
good and bad results. Some comments can be positive and provide great direction
on why users like a specific post. Comments can also be critiques of content that
we can use to make our posts better in the future.
How to Track: Social Media Management Tools
Most social media platforms keep us up-to-date with new followers and post interactions. However, having multiple social media channels can make it hard to keep track of all of them efficiently. Social media management tools, such as Hootsuite or MeetEdgar, allow us to create, post, and track how our content is doing on all our social media platforms through one tool.
Email
Despite the popularity of social media, email
marketing is still an effective way to interact with your audience. With
emails, we can keep our users informed about our business, share special deals,
and encourage users to check out our products and services.
To track the effectiveness of an email campaign, we can
note subscribes, open rates, and forwards. Keeping track of how many users
subscribe or unsubscribe can inform us on how effective our subscribe pitch is
as well as how interesting our email content is. Open rates, much like page
views on a blog, can help us determine if the topics we are discussing are of
interest to our users. Tracking forwards is much like tracking shares on social
media; it can help us identify content that resonates with our readers.
How to Track: Email Marketing Tools
In order to track how our emails are doing, we can use email management tools. AWeber, for example, can be used to create, send, and track how our subscribers are interacting with our email content. Management tools such as AWeber also allow us to breakdown our audiences into specific groups, enabling us to further optimize our content per customer type.
Site Performance
Beyond tracking content engagement, tracking how our site is
performing is important in ensuring quality user experience. Following Google’s
Core Web Vitals, our site’s performance can be measured by tracking the speed
of our site.
To measure the performance of our site, we need to be
looking at how fast our page loads, stabilizes, and responds. When a user first
arrives to our site, the time it takes for our page to visually appear would
determine how fast our site loads. However, even after our page loads, our page
may not load entirely at once. The speed of which our site stabilizes, or
rather, adjusts the content to its right location, is important to note when
measuring performance. Lastly, with our site ready for use, noting how long our
site takes to respond to user input, such as a click of a button, can help us
understand the quality of our user experience.
How to Track: Performance Tools
There are a few free tools that we can use to measure the speed of our site. Page Speed Insights, GTmetrics, and Webpagetest are three tools that we can easily use to get an idea of how our site is performing.
Search Engine Optimization (SEO)
Even if our site and content are performing well, ensuring that our site is easily findable is key to bringing more traffic to our site. This means that we need to be able to create and measure Search Engine Optimization (SEO) strategies.
To measure how searchable we are, we should track keyword ranking, average position, and overall organic traffic. When optimizing our site for searchability, we want to identify the keywords that we utilize when it comes to user’s searching for our content. Noting those words and how often our site is associated with them is important in identifying if the keywords we are using are successfully bringing traffic to our site. With the handful of keywords we do rank for, we want to note where we show up in search results. Are we in the top 5 results in a Google Search? Or are we a couple pages behind? Our position can say a lot about the whether or not we should keep focusing on certain keywords or phrases. Finally, we should keep track of how much traffic search results are bringing us as an overall baseline for how our SEO strategy is doing.
How to Track: Search Tools
There are a few tools we can use to check our SEO rank and relevant keywords. However, to see the a fuller picture of how our SEO strategies are performing, we can use Google Search Console, an SEO tool that shows us how Google ranks and presents our sites.
Want to Learn More?
By measuring our efforts, we can make clearer strides
towards optimizing our website for more traffic and more conversions. Explore our other blogs to
learn more about what you can do to improve your site! If you are interested in
a more hands-on course about how to optimize your website, join the waitlist for Carrie Saunders’ upcoming course, “The
Converting Website.” In this course, she will dive into
important factors that aim to increase the conversion rates of your site!
Part of establishing an online presence when it comes to our businesses is having a distinguished brand. With a quality brand, customers should be able to quickly recognize our business no matter what platform we are using, as well as understand who we are. However, a company brand is more than just our logos and slogans. Brand bleeds into the words we use, the visuals we utilize, and the stories we share. In this article, I want to go over some key aspects to keep in mind when shaping our brands.
What makes a Good Brand?
Our brands are what many potential customers will notice
first, as well as what they will remember when leave our sites. Having a good
brand means that your business is recognizable both in its visuals and its story.
Company purpose, values, and origins can be communicated through your brand,
and a successful brand will be memorable and attractive to your target audience.
Just like many other aspects of our sites, our brand is another part of our
business that should speak to our users.
How do I create my brand?
Know your Audience
The key to creating content that resonates with your users is to know your users well. When creating our brands, we need to understand what our customers are looking for. This includes researching their pain points, demographics, as well your competitors. By understanding what is available to your target what they really want, you can design your brand around a gap in your industry. We can find this gap by identifying issues our ideal customer is having with other companies as well as potential audiences who seem absent from the market.
Share your Story
After we have a firm grasp on our audience, we should decide
how we want to share our story. How did your company start? Why are you
invested in it? What makes your company special? Sharing our story can help us illustrate
values that our customers can connect with. In terms of our brand, this is important
since the stories we tell create a persona around our company. Creating a
persona that is comfortable, relatable, and reliable can establish trust
between us and our customers.
Choose your Words
Since the stories we share shape the face of our company, the words we use also come into play in creating a trustworthy and memorable brand.In our blogs concerning SEO, we emphasize the importance of communicating with words that your users use and understand. Consider how your customers talk about their troubles and the solutions they are looking for. By speaking the language of our customers, our brand will better resonate with our target audience since we will be speaking directly to their concerns and needs.
Create your Visuals
With the “voice” of your brand established, the next big
step is creating a visual representation for your company. This includes
your logo, color choices, fonts, and commonly used images. Your logo and colors
will depend on what is recognizable in your specific industry and to your
target audience, as well as what your company’s story and goals are. Fonts
should be readable and create the tone your company wants. Having of a
collection of images to use on your site and promotional content can help add
variety to your content. The key aspect to having successful visuals is
consistency. Make sure to use the same fonts, logos, colors, and types of
images throughout your content to create a sense of professionalism and make
your company easily recognizable.
What’s the secret to a Memorable Brand?
When creating a quality brand, we need to make sure that
we are consistent and that our brand is in everything we create. Whether it
be on our site, on social media, or in marketing content, the voice and
appearance of our business should be present and similar to the rest of our material.
We can do this by documenting our
brand. Have your colors, fonts, keywords, and images saved and annotated in
terms of when, where, and how to use them. Having a variety of sizes, file
types, and styles for your brand material can also aid in maintaining
consistency throughout your channels. Overall, creating essentially a kit
for your company can aid in making sure your team is all on the same page when
creating content.
Want to Learn More?
Our brand is just one part of our business identity that we need to consider when creating quality content and attracting more customers to our site. Explore our other blogs to learn more about what you can do to improve your site! If you are interested in a more hands-on course about how to optimize your website, join the waitlist for Carrie Saunders’ upcoming course, “The Converting Website.” In this course, she will dive into important factors that aim to increase the conversion rates of your site!
With the popularity of smartphones, many first-time users of
our site will be visiting from their phone screen rather than on a desktop
computer. In order to ensure that our site makes a good first impression no
matter what device users are coming from, we need to create sites that are
mobile friendly. This means our site should adjust appropriately to the device
it is being viewed on.
Why are Mobile Friendly Sites important?
Beyond the fact that many eCommerce customers shop via their
phones, there are other benefits to making our online shops and websites mobile
friendly.
To start,having a quality mobile site can increase
your ranking in search engines. Some search engines, such as Google, not
only incorporate mobile friendliness into their ranking criteria, but they also
have taken to ranking mobile sites first. This means that, even with a quality
desktop site, your mobile site may be reviewed for search results instead,
impacting your SEO score.
Other than SEO, having a good mobile site directly
impacts user experience. With the potential of visitors viewing your site
on their phones, we want to make sure that our site shows the best our company can
offer. This includes things like fast loading times and complete access to the
same features your desktop site offers. By having a quality site no matter the
device, we can create an experience that positively impacts our reputation and encourages
reoccurring customers.
What Makes a Site Mobile Friendly?
Mobile Responsiveness
When visiting your site on mobile, it may be hard for users
to interact with your pages if they are the same size and format of your
desktop site. If your site is too difficult to use, a potential customer may
leave before giving your products a chance. To avoid this, a responsive
design on your website is a must have. A responsive site is a site that is
able to reformat itself to the screen size it’s on. This means that, if your
site is visited on mobile, the page’s text, buttons, menus, and so forth will
be resized for better use on a smaller screen.
Adjusted Navigation
A responsive mobile site will not only adjust the pages themselves, but also the navigation menus and search features as well. On mobile, a full navigation menu could either take up too much space, or be too small to interact with. Instead, the menu should be resized and reformatted. Many sites utilize the “Hamburger Menu” for mobile view. A hamburger menu appears as a button that users can click to open up the menu as well as close it. This allows users to explore your site without the menu being in the way while also keeping the menu properly sized and usable.
Note: Make Your Search Option Obvious
A part of making your site mobile friendly is making it easy to find the content a user is looking for. However, even with adjustments to size and navigation menus, it still may difficult to locate specific pages on such a small screen. Having a search option easily accessible and clearly visible can give mobile users another option to use when exploring your site.
Readable Text and Buttons
On a small screen, reading content and clicking buttons can be a difficult task for users. Some users may click a button only to accidentally hit another, or even miss it entirely. Zooming in to read small text can quickly become a chore while exploring your site. To avoid discouraging your user from using your site, your site should have bigger text and optimized buttons for mobile use. Text should be readable without zooming in and buttons should be adjusted for touch rather than clicking. Making your site easy to use and readable will help keep users on your site longer.
Optimized Visuals
While our banners and videos may look great on a desktop computer, squeezing those visuals onto a smaller screen can result in diminished quality and usability. Especially with our Above the Fold content, we want to make sure that the presentation of our visuals translates over to mobile view. This means that our site should resize these visuals and re-arrange them according to the device they are on.
Note: Hiding Features can Negatively Impact your Site
When adjusting our site to mobile view, we may be tempted to hide certain features and images that are available on the desktop version of our online shop. However, hiding content from viewers can impact your SEO score. While your users can’t see the missing content, search engines like Google can tell that you have hidden content from the page. Google does not approve of hidden content and will note it when ranking your site. Avoid hiding content and instead reformat the content the best you can for mobile use.
Want to Learn More?
Improving our site for user
experience is key to bringing more traffic to our sites, and thus attracting
more potential customers to consider our content and products. Explore our other blogs to
learn more about what you can do to improve your site! If you are interested in
a more hands-on course about how to optimize your website, join the waitlist for Carrie Saunders’ upcoming course, “The
Converting Website.” In this course, she will dive into
important factors that aim to increase the conversion rates of your site!